Emails have become the primary communication between businesses, vendors, and associates. Unfortunately, emails aren’t 100% secure, and you need additional protocols like DKIM (DomainKeys Identified Mail) to verify the email sender’s identity and ensure that the email body wasn’t altered in transit.
The sender’s identity is verified by a digital signature included in the DKIM-Signature header field in the email message. The digital signature is generated using the sender’s private key, which is stored in a DNS record. The email message recipient can use the sender’s public key, retrieved from the DNS record, to verify the digital signature.
DKIM helps protect email senders and recipients from spoofing, phishing and spam.
Cloudflare is a content delivery network service which, among other things, provides a firewall and performance layer for your website. It has plenty of paid upgrades and features.
The content delivery network can offer several benefits, including better performance, reliability, and security for web properties.
Now let’s see how to add DKIM record in Cloudflare in several simple steps.
Steps to Add DKIM Record in Cloudflare
This article is a step-by-step guide on how to set up DKIM record in Cloudflare.
How to Generate a DKIM Record?
If you are using Third-Party ESPs, DKIM Public keys are received from their portals. Because of security and privacy, ESPs won’t share their Private Keys.
While you can create a DKIM record manually if you know its syntax, generating a DKIM record with a generator is a matter of minutes.
EasyDMARC’s DKIM Generator tool for dedicated servers is mainly made to make the process easy and fast. You can implement the Public key in your DNS and store the Private key in your server at the same time.
Important Note
Before diving into steps on how to set up DKIM record in Cloudflare, it is essential to understand that each provider has their own Private/Public Keys that they provide to their customers.
This article takes Zoho Mail as an example. We’ve generated the DKIM Public signature from the Zoho Mail portal, and in the following steps, we will implement it in our Cloudflare DNS.
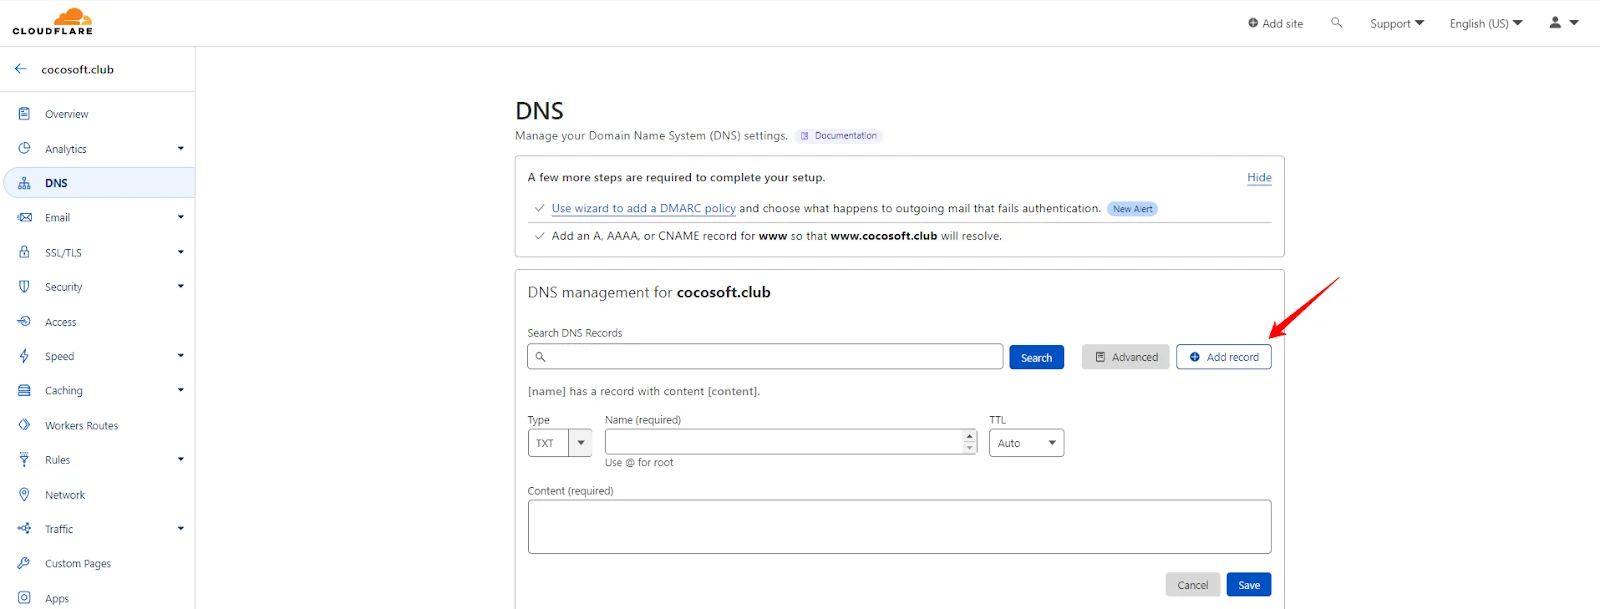
Step 1. Add a New DKIM Record
- Log in to your Cloudflare account
- Navigate to the DNS section
- Find the “Add record” button and click it

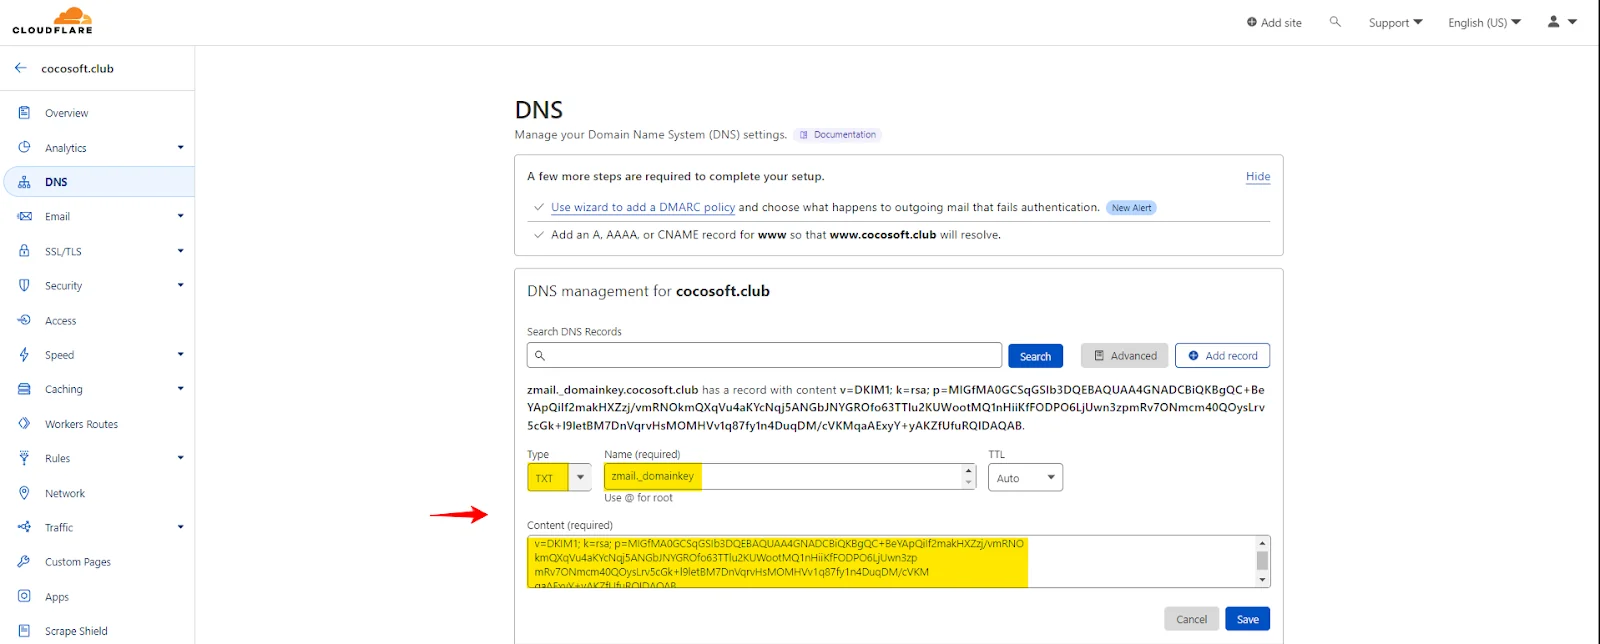
Step 2. Make sure to add your DKIM Type, Host, and Content
- In the same section, find the Type, Host (required), and Content (required) fields
- Fill in the Name (required) and content (requires) fields

Moving on to learn how to set up DKIM record in Cloudflare, let’s see an example of how to fill in the record fields:
| Type | Host | Content |
| TXT Record | zmail._domainkey | v=DKIM1; k=rsa; p=MIGfMA0GCSqGSIb3DQEBAQUAA4GNADCBiQKBgQC+BeYApQiIf2makHXZzj/vmRNO
kmQXqVu4aKYcNqj5ANGbJNYGROfo63TTlu2KUWootMQ1nHiiKfFODPO6LjUwn3zp mRv7ONmcm40QOysLrv5cGk+l9letBM7DnVqrvHsMOMHVv1q87fy1n4DuqDM/cVKM qaAExyY+yAKZfUfuRQIDAQAB |
Note: Content part contains the public DKIM signature that was generated from the Zoho Mail portal.
Step 3. Finish your Cloudflare DKIM setup.
And finally, click “Save” to finish your Cloudflare DKIM setup.
How Can EasyDMARC Help?
DKIM uses a cryptographic key pair, one public and one private, to link an email to its domain.
If you are unsure whether you have a DKIM record, you can use EasyDMARC’s DKIM lookup tool below.
If you add a DKIM record to your DNS, your recipients can be sure that your messages come from you and haven’t been impersonated.
This practice verifies every email you send, decreasing the odds of you being blocked by email filters.
You can also configure a DKIM signature for your domain to improve your deliverability rates.

